LED OCD
11/30/2013
I originally wrote this "informal review" of Herg's LED OCD and posted it on Pinside.com.
Informal Review
11/30/2013
Altan's LED OCD Informal Review
Revision 1.03
Over the past few years many pinball owners have decided to "go LED". This is likely
encouraged by the ever increasing number of LED sources, recent pins by Jersey Jack Pinball
and Stern using LEDs, owners wanting to bling out their machines, reduced power needs and
heat, and because many pinball owners want to tweak their own machines to perfection.
But Bally/Williams WPC machines were designed to use incandescent lamps and may not take
kindly to LEDs. At a very high level, it's important to understand that LEDs and
incandescent lamps have very different characteristics. For example, LEDs can almost
instantly turn on and achieve full brightness while incandescent lamps have a longer "ramp
up" time. The WPC software was designed to control lamps with incandescent characteristics,
not those of LEDs.
This mismatch causes at least 3 problems: ghosting, strobing and the loss of fading effects.
Ghosting occurs when a lamp should be turned off but instead it flickers on and off dimly.
Strobing occurs when the lamp should be "on" for a period of time but rather than being
continuously on for this period, the lamp very quickly cycles between on and off. Some may
call this flicking when the on/off is further apart. Finally, loss of fading effects occurs
because the pattern of electricity that makes an incandescent bulb ramp from off to full
brightness in a period of time will typically cause an LED to stay off for a bit and then
strobe.
Note that WPC games control the General Illumination differently than the lamps in the Lamp
Matrix. While the lamp matrix can experience at least the 3 problems listed above, the G.I.
is typically troubled only by strobing and loss of fading effects. Ghosting isn't a
problem.
The LED OCD product is designed to solve the problems that occur when a WPC is controlling
LEDs in the lamp matrix (it does not address problems with the G.I.). In addition to the
problems mentioned above, the LED OCD product offers unique control over each lamp in the
matrix. The LED OCD also has the very nice ability to concurrently drive both incandescent
and LED lamps.
LED OCD has 3 main parts:
1) The main LED OCD board
2) A jumper/breakout board (which is unique to the WPC version of LED OCD)
3) Various cables
I was initially surprised by what seemed to be a significant number of cables provided in
the package. However, after closer inspection, I realized there are not a large number of
cables but rather 2 large cables and a USB cable. The two large cables are special cables
for LED OCD that have a single large connector on one end and two smaller connectors on the
other.
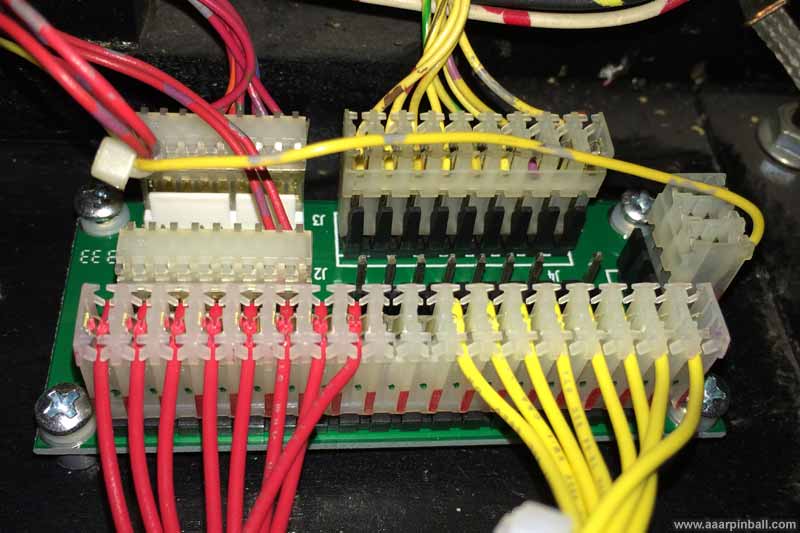
The first picture below shows the main LED OCD board. It is slightly larger than a WPC instruction card. The second picture shows the jumper/breakout board.

Installation should be straightforward for anyone that has experience pulling connectors
from inside the backbox. The large number of steps included in the detailed instructions may
make the process appear harder than it actually is. Installing LED OCD requires no permanent
changes to your pinball machine.
The installation involves:
1) Mounting the LED OCD board in the backbox
2) Mounting the jumper/breakout board in the backbox
3) Disconnecting the lamp matrix cables from the WPC driver board
4) Connecting these same cables to the jumper/breakout board
5) Using one of the supplied cables, connect the WPC driver board's output to the LED
OCD board
6) Using the other supplier cable, connect the LED OCD board to the jumper/breakout board
7) Using a Z-connector, have power go to the LED OCD board
Originally the WPC driver connected directly to the lamps. With the LED OCD board installed,
the connection is
WPC driver board -> LED OCD board -> jumper/breakout board -> lamps
As can be seen from the sequence above, the LED OCD board is installed between the WPC
driver board and the lamps. At this location the LED OCD board is able to look at the
signals being generated by the WPC driver (which were designed to control incandescent
lamps) and convert them into an appropriate signal to drive LEDs (or incandescent).
Installation took me about 30 minutes. The majority of this time was taken by mounting the
boards in the backbox and simply being careful. I had a little trouble mounting the LED OCB
board itself using the supplied adhesive mounts. Even after cleaning the backbox area with
isopropyl alcohol, the top right mount didn't want to stick well. Also, there was a sticker
on my backbox where one of the adhesive mounts ended up. I think these could have easily
been resolved with a little more prep work on my part. For anyone doing the install, I
recommend:
1) Use the screw mounts rather than the adhesive mounts
2) Look carefully where you want to mount the LED OCD board and ensure there is no metal or
other object in the way
3) Keep in mind there is a USB connector on the LED OCD board and you want to ensure the
mounting position allows access! Be very mindful of this! I suggest connecting the USB cable
when determining where to place the board.
Now that I've done the install once, I expect another installation would take 15
minutes.
Before talking about LED OCD's behavior in the real world, let's set a baseline. I was
playing around with LEDs in my Twilight Zone (with home ROM 9.4h). I replaced a few lamps in
the lamp matrix with LEDs to see how they compared to traditional lamps. I was very
unimpressed with the LED experience. This was the same poor experience that I have had with
other WPC games that have LEDs in the lamp matrix. To me, there was terrible strobing when
playing the game. The effect was most obvious when the ball rolled over an insert. Also,
with LEDs installed, the fade effects were destroyed. Wham! It's on. STROBE. STROBE. STROBE.
Wham! It's off. And so on.
Note that I didn't have any ghosting problems because ROM 9.4h includes the Williams change
avoids ghosting.
For this experiment with LEDs in my Twilight Zone, I installed just a few LEDs in the
following inserts:
1) GUM insert
2) BALL insert
3) "Lock 2" insert
4) Bottom pop bumper
The LEDs I used are Pinball Life's "Ablaze 3-LED #555 Wedge Base Lamp" with "Warm White"
color.
I took a video to show this terrible strobing. A slow motion camera is required to capture
these LED behaviors because the cycle times exceed the regular 24, 30 or 60 frames per
second offered by normal cameras.
With the LED OCD board installed, the change in behavior is nothing less than amazing. The
strobing is gone. The LEDs fade correctly. In short, the LEDs look fantastic. With LED OCD,
you can take advantage of the various colors, diffusions, and brightness offered by the LED
vendors and have none of the traditional LED ill effects. The slow motion video shows how
great the LEDs look with the LED OCD board installed.
The following side-by-side video shows the standard WPC behavior on the left and the LED OCD
behavior on the right.
The default behavior of the LED OCD is to drive all the lamps in the lamp matrix as LEDs
using what is referred to as the 85% profile. However, each lamp can be individually
configured to use 1 of 8 profiles. A profile allows for an 8-step brightness transition and
delay that effects how quickly the 8 steps occur. The default 8 profiles are named:
1) Incandes (for traditional bulbs)
2) LED 25% (max brightness is 25%)
3) LED 35%
4) LED 45%
5) LED 55%
6) LED 70%
7) LED 85% (generally recommended brightness)
8) LED 100% (maximum brightness)
I learned that 100% isn't the default because it may cause ghosting. With this setting, the
LED is enabled for as long as the lamp matrix allows. However, at the electronic level the
various components (transistors, etc.) are analog and require a certain amount of time to
engage or disengage. Because the LED 100% profile doesn't account for this, you may see
ghosting in the lamp that is in the same row but the next column. The LED 85% profile plays
it safe to ensure this never occurs.
To make these "OCD" level adjustments, you connect the LED OCD board to a computer using the
provided USB cable. The software requires a Windows machine to run, so Mac users (like me),
Linux users, or any non-Windows person will need to borrow a Windows machine or attempt to
use a virtualization solution. The software isn't completely self-contained, requiring other
packages to be installed (example, ".net" and a USB to RS232 driver).
I grabbed an older laptop with Windows 7 and gave it a shot. It didn't go smoothly and took
about an hour to get working. First, the USB cable provided with the LED OCD is quite long
and didn't interact well with my laptop. I switched to a much smaller one I had and started
making some progress. Second, I had trouble installing the USB driver. After a couple of
attempts and a few reboots, it started working. The LED OCD site has a good troubleshooting
section that was quite helpful.
The LED OCD software is simple but effective. It comes with a set of data files that
associate the lamp row/column number with the friendly name. If your game isn't listed, it's
easy to enter the friendly names yourself. Alternately, you can use a generic data file
where the friendly name is simply the same as the row/column lamp number.
With the WPC version of LED OCD, the software supports a "Pass-through" feature. With the
press of a button, the LED OCD board effectively disables itself (although the signals still
pass though the LED OCD board). This feature is useful to perform an A/B comparison of the
original behavior against what your current masterpiece in progress offers.
Another nice feature is the ability to send a new configuration to the LED OCD board without
storing it permanently. You can try out various combinations knowing that you can always go
back to the original just by turning the game off and back on. When you have found something
you like, you can permanently save it to the LED OCD board. Of course you can always save
configurations to your local storage and retrieve them later.
I was pleased to find the LED OCD board saves configurations in an easy to figure out XML
format. In my (unusual case) where most lamps are incandescent, I opened the XML file in an
editor and did a search and replace to change all profile 7 (LED 85%) entries to profile 1
(incandes). That was much faster than manually selecting each lamp and then selecting
profile 1. Instead, I only needed to manually change 4 entries (lower pop bumper, GUM, BALL,
and "Lock 2"). Note: the video above was taken before I made this switch, meaning all lamps
are being driven with the 85% profile.
I've played around 30 games of Twilight Zone with the LED OCD board installed. The strobing
is gone, the fading is back. When I went back to the non LED OCD setting, I was amazed how
terrible it looked. I can confidently assert that I would never think about doing a partial
or fully decked out WPC LED game without the LED OCD board. It solves the inherent problems
which occur when putting LEDs into a game designed for incandescent lamps and, in the
process, removes the need to purchase any of the expensive anti-ghosting LEDs.
Hope this has been helpful.
More information about LED OCD, including purchase information, can be found at
http://ledocd.comuv.com. Also, Herg is the inventor of LED OCD and is an active pinside
member.
... Altan
http://www.aaarpinball.com
Revision 1.01: Clarified purpose of Jumper/Breakout board
Revision 1.02: Added side-by-side video (and removed individual videos)
Revision 1.03: Moved to this web page. Added a few pictures and did slight reformatting.