Onkyo TX-NR818
Warning: The text here has had no proof reading! Please excuse any typos, etc.
Onkyo TX-NR818 Review
2/13/2013
I've got to set the record straight... This isn't a review of the TX-NR818. It's a collection of observations I've made as well as general comments pertaining to this receiver. Maybe it's better than a review? I know for a fact there is a bunch of stuff below that no reviewer came close to discussing. I hope you find something useful.
Introduction
2/10/2013
I purchased an Onkyo TX-NR818 to replace my trusty Harman Kardon HK525. The HK525 served me well for 10 years but was getting a little long in the tooth. It didn't have any HDMI video support, it didn't have any audio/lip sync adjustments and it didn't support the more modern "lossless" audio formats such as DTS-HD Master Audio or Dolby True HD. When the HK525 started developing a hum in the left surround channel, I started looking for a replacement.
I quickly started focusing on Denon receivers. I can very close to purchasing a Denon 2113ci and then a Denon 2313ci, but ultimately decided to hold off. I realize that some may say I'm just crazy or silly for worrying about this, but I had a really hard time getting over the fact that the new Denons are very light. My trusty HK525 was quite heavy, about 45 or so pounds. The new Denon receivers are around 21. Does this really mean anything? It's not clear to me. But ultimately it was a driving factor in holding off on my purchase of the Denon.
I started looking at other options and found the Onkyo TX-NR818. To me it seemed better than the Denon is almost very way (but not all). Some pros:
-
The Onkyo TX-NR818 has Audyssey MultiEQ XT32! This was probably the #1 benefit.
-
The Onkyo had more watts per channel. Yes, I realize that you need to double the watts to double the sound and there isn't a huge difference between, say, 100 watts and 130 watts.
-
The Onkyo has (vastly?) superior video processing (HQV and Qedo)
-
The Onkyo has more HDMI inputs
-
Per the specifications, the Onkyo will do a better job of converting Component video into HDMI (wider bandwidth range)
-
The Onkyo doesn't feel cheap (I personally though the Denon's volume knob felt very cheap)
-
The Onkyo has THX modes and is THX certified (Hey... it cannot hurt)
-
And finally... it weighs 2x as much as the Denon. Yeah, this may mean nothing. But it made me feel better.
There were only 2 negatives of the Onkyo
-
History of poor quality (mostly HDMI issues) in previous years. Only time will tell if they TX-NR818 is immune to this and whether it should have been a major factor in my decision
-
The Onkyo TX-NR818 doesn't support AirPlay. Luckily this isn't a "you don't have the feature so you will never have it" type of thing (like the Denon missing Audyssey MultiEQ XT32). An AppleTV or Airport Express can be added to, presumably, do the job even better (but at additional cost).
When a fantastic deal on the Onkyo TX-NR818 came up (basically cheaper than the Denon 2313ci), it was a no-brainer to make the purchase.
What follows is a collection of behavior explanations, tips, and various comments about the Onkyo TX-NR818.
Onkyo TX-NR818 HDMI EDID
4/14/2013
EDID is the configuration data provided by the display. It states many things including what
resolutions the display supports, whether the display has speakers (and how many). It also
contains a very basic attempt to handle lip-sync by providing latency information for audio
and video for both progressive and interlaced content. Much of this is optional.
Anyway, here are a couple of things I noticed
1) If you have a source device connected to the TX-NR818 and the TX-NR818 is NOT connected
to a sink, the TX-NR818 still tells the source it can display video. It provides some
standard set of output resolutions. So your source may think it is outputting video that can
be seen, but in reality it's being consumed and discarded by the TX-NR818.
2) The TX-NR818 also places information about your speakers into the EDID. In my case, it
stated I had a 5.1 setup and indicated which speakers exist.
3) When a real sink is connected (your TV / Projector / etc), the TX-NR818 merges its EDID
data with that of your display
4) It appears to take the video data directly from your display while adding the audio data
(e.g., 5.1 setup). My projector has no audio support, so anything directly connected will
receive no audio details. However, if connected through the TX-NR818 then you get the
TX-NR818's audio data plus your display's video data.
5) This is, perhaps, the only real surprising item I found. The TX-NR818 does mess with the
latency information provided. At least a little. As noted above, the HDMI spec for EDID
allows latency to be provided for
a) video that is interlaced
b) audio associated with the interlaced video
c) video that is progressive
d) audio associated with the progress video
Basically this is saying that the display/sink may introduce a different amount of latency
when processing progress and interlaced content.
My display only indicates a latency for progressive video and interlaced video. It doesn't
say anything about audio, since it doesn't support audio. However, when the TX-NR818
"processes" the EDID, it adds information about audio latency. It seems to simply duplicate
the video latency. Example:
Projector says progressive video latency is 50ms and interlaced video latency is 70ms. When
the TX-NR818 passes this data to a source, it will say progressive video latency is 50ms and
interlaced video latency is 70ms but will also say audio associated with progressive video
has 50ms latency and audio associated with interlaced video will have 70ms latency.
I cannot comment whether this behavior is good or bad, just sharing it... But it's safe to
conclude that saying video delay equals audio delay pretty much means the default state has
NO lipsync problems. This would seem to say to a source device that historically adjusts the
audio and video, based on this info, that there is no need to make any adjustment (since the
latency is the same for both audio and video).
Downgrading Onkyo TX-NR818 Firmware
Original 3/18/2013
If you need to force the Onkyo TX-NR818 to use a firmware image, the following steps are available:
Press and hold the "NET" button on the front of the receiver, then press the ON/STANDBY button. "UPDATE" will show on the receiver's display. Press enter to force the update.
Fine Tuning Onkyo TX-NR818 Lip Sync (AV Sync)
3/3/2013
Lip sync (AV sync) is a funny thing. Some people are much more picky about it than others. I
find that small problems with lip sync are pretty annoying. For example, each time I changed
my DirecTV set-top (originally had the old Tivo MPEG-2 HD box, then the more modern H.264
non-Tivo version), it seemed like the lip sync was "different" and initially made viewing an
annoying experience.. Was it wrong or worse? Hard to tell. However, after a week or so I'd
realized the new setup was fine ("the new normal").
To fine tune the TX-NR818's lip sync, I have a couple of suggestions:
1) Turn off Lip Sync in the Hardware setup (not the source setup). This is the setting that
tells the receiver to get the latency introduced by your display and adjust for it. In my
experience I found it worked much better with it disabled. Then, if needed, manually adjust
the delay under the per source setting. When you use the auto lip sync functionality, the
result is only as good as the information provided by the display and how well the Onkyo
reacts to this information. The display is only able to provide limited latency information,
and it certainly doesn't handle all the various functions which can increase or reduce
latency, so it's really just a best guess.
2) Try it with Audyssey Dynamic EQ disabled. This is the Dynamic EQ, not Audyssey Multi EQ.
The two are very different yet have somewhat similar sounding names.. I've found that
disabling Dynamic EQ tightens up lip sync a little. I asked Audyssey about this and they
reported that Dynamic EQ is "essentially" a zero latency technology. Whether "essentially"
means less than 1 millisecond or something greater, I don't know. From Audyssey's response,
Dynamic EQ should have "essentially" no effect on AV sync, but my current belief is that
enabling it on the TX-NR818 causes AV sync to be a little off.
3) Finally, make a couple of tweaks and give it several nights of viewing to check it out.
Don't obsess over it... Don't stare at people's mouths in the video. You probably didn't
obsess over it prior to adding the TX-NR818 into the equation and you may just be noticing
that lip sync isn't always as tight as you may like, regardless of the setup. You don't want
to end up blaming the TX-NR818 for things that previously existing and you are only now
focusing on.
Help Stop my TX-NR818 from Clicking while performing DVR Trick Modes
Original 2/17/2013
Updated 4/9/2013
I use Windows Media Center running on a PC and an Xbox 360 for my television viewing. The first time I watched television with the TX-NR818, I occasionally noticed a clicking sound from the receiver while performing DVR trick modes (fast forward, rewind, jump, etc.). It was pretty annoying ... the clicking was in no way subtle. This is especially the case when there is no audio. Also, it was a little unnerving to have a loud click correlating with remote presses.
After some trials, I was able to determine there are two causes for the TX-NR818's clicking. One case is the receiver transition from 5.1 output to 2.0 output. The other is the reverse, the receiver transitioning from 2.0 output to 5.1 output. It appears the Xbox/Windows Media Center doesn't output a constant Dolby Digital stream during trick modes and, occasionally, the TX-NR818 thinks it is receiving a PCM 2.0 source. When this occurs, the TX-NR818 switches from outputting 5.1 to 2.0 and clicks. When the trick mode ends, the receiver starts receiving Dolby Digital again, causing a transition from 2.0 output to 5.1 output and another click.
Note: It's worth noting that you can manually trigger the clicking at any time by simply cycling through the TX-NR818's audio modes using the remote. You will hear the clicking when selecting Stereo and a few others which I've forgotten.
Ignoring the fact that the Windows Media Center seems to stop sending Dolby Digital during trick modes, the root of the problem is that the TX-NR818 is "smart" and remembers the last output mode for each audio input mode. Dolby Digital is one input mode and PCM 2.0 is another input mode. It appears the default output mode for PCM 2.0 sources is Stereo and the default output mode for Dolby Digital is 5.1.
My goal was to tell the receiver to always output 5.1, even for PCM 2.0 sources. There is a Home->Setup->Listening Mode Preset menu that would appear to give this exact ability, but it didn't work for me. I ended up with a simple work around. I configured the TX-NR818 to use the optical input for audio, rather than the HDMI connector, and feed it a stream from a CD player. This caused the Onkyo TX-NR818 to select PCM 2.0 mode on the DVR input. I then told the receiver to always output 5.1 by selecting "All Ch Stereo". I then put the audio back to HDMI.
Now when performing trick modes and the TX-NR818 sees a transition from Dolby Digital to PCM, it no longer changes the output from 5.1 to 2.0. It just stays in 5.1 mode. Since it doesn't transition to 2.0, there is no click.
Problem solved.
4/8/2013 Update
It was pointed out to me that the TX-NR818's "Listening Mode" only takes effect when you power on the receiver. I went back to the Home->Setup->Listening Mode Present menu and for the "Analog/PCM" field selected "PLII Movie" (Dolby Prologic II Movie). I powered off the TX-NR818, and then powered it back on. I performed trick modes and verified there was no clicking. Also, when the receiver detected a PCM 2.0 source it indicated it would now outputting PLII Movie.
This is the simple and preferred method to stop the TX-NR818 from clicking when performing trick modes.
Oh my! The Onkyo TX-NR818 24fps Bug!
Original 2/12/2013
Updated 3/18/2013
The TX-NR818 had a pretty nasty bug. When the source provided a 23.97 fps signal, the Onkyo's main HDMI output would send 24 fps to the display. While this may not sound like a big deal to the average Joe, the result is that the Onkyo TX-NR818 would drop a frame of video about every 41 seconds. Depending on the content (fast motion, panning, still, etc.) the dropped frame could be almost unnoticeable to extremely apparent. Most Blurays for the North American market are encoded as 23.97 so there is plenty of content available that is susceptible to the problem.
Notes:
(1) The TX-NR818 had a similar problem with 59.96 content, choosing to instead output
exactly 60 fps.
(2) This problem did not exist when the "sub" HDMI output was used.
After a prolonged period of time, Onkyo released an "on request only" firmware with a fix for these two issues. This means one must send Onkyo an email requesting the corrected firmware. The corrected firmware reports itself as version "1110-8103-0101-0000".
I was able to easily see the 24fps bug using Disney's WOW calibration disc. It has a test pattered for adjusting audio delay to sync it with video. This pattern has a line that constantly rotates. While it can get tiresome to watch this pattern for 40 or 50 seconds, doing so while show the hiccup. The test pattern does tend to restart too often, so don't mistake that for the hiccup. Once I upgraded to the 1110-8103-0101-0000 firmware, I was unable to see the problem.
Sometime in March (2013), Onkyo announced they would make this version of the firmware available to everyone through their web site. They also stated there are no plans to make this firmware update automatically available through the network upgrade.
Onkyo TX-NR818 has incompatibility with Sony VPL-HW30ES Projector
Original 2/12/2013
Updated 4/8/2013
Imagine my surprise when, after connecting the TX-NR818, I found that my HW30ES projector would not turn on. It would act like it was powering on, but then would display a pattern of 12 flashing lights. After some additional investigation, I determined that the HW30ES would only power on if the TX-NR818 was powered off!
I suspected some sort of HDMI CEC conflict. I don't use CEC, so it was already disabled on the HW30. After adjusting the settings on the TX-NR818, and ultimately trying all the combinations between the HW30 and the TX-NR818, I still wasn't able to power on the HW30 when the TX-NR818 was already powered on.
I contacted Onkyo and they reported this is a Sony problem and that I should contact Sony. I then contacted Sony and spoke to a guy that was very knowledgeable, immediately knew about the problem, and strongly said that it's an Onkyo problem. While I didn't catch everything, I believe he made some reference to how the Onkyo handles the HDMI 5V line when the hot plug event occurs. He further told me that Sony helped Onkyo with this in the past, resulting in Onkyo releasing a firmware upgrade (at least for some unit). I went back to Onkyo and communicated what Sony had stated and suggested that Onkyo and Sony could get together and discuss. Onkyo agreed and ...
3/3/2013 Update
Through experimentation, I learned the Sony HW30 projector needed to be powered on a good 15 seconds prior to powering on the Onkyo TX-NR818 to avoid this problem. As much as I tried, I couldn't find an acceptable way to get my Harmony remote to obey this constraint. For what it's worth, I did have modest success with telling the harmony to use the wrong code to power on the projector, adding some delays, and then sending the real power on command. But this was just ugly and I wanted a better solution.
I found a semi-work around for this problem, but it was a hack. I had the output of the TX-NR818 going into a Monoprice 4x1 HDMI switch's input and the output of the switch going to the projector. The switch was set to always select the input from the Onkyo (nothing was attached to the other inputs). The addition of the switch seems to perturb the HDMI timing enough such that I could get both the Sony HW30 and the Onkyo TX-NR818 to power on with my Harmony 880. Note that with this setup I still cannot power the projector on when the Onkyo is on, but it solved the problem for 95% of the situation (the "one button system power on" use case).
FWIW, as of this writing it has been 3 weeks since I reported this behavior to Onkyo. They stated the on-sight engineer would look at it. Even though I've posted friendly "just keeping this thread alive" messages every 3 or 4 days, Onkyo latest statement is they are "waiting for permission" to field test this issue.
3/7/2013 Update
Onkyo did get hold of an HW30 and performed a test. Unfortunately, they didn't test it appropriately. They created a video showing everything works fine, but in the video you can see that they first power on the HW30 and then power on the TX-NR818. It's unfortunate they spent the effort to get the equipment only to completely test the wrong thing. In response, I've listed specific steps and am hopeful they will be able to retest. I've also provided Onkyo two separate videos showing the problem. Onkyo has stated they will retest.
3/18/2013 Update
Onkyo has been silent since stating they would look at the HW30/TX-NR818 a second time. I, however, have gained a good understanding of the problem. It still exists, but is easily avoidable.
The Onkyo TX-NR818 and the Sony HW30 projector will get into a bad state and exhibit the bad behavior where the HW30 will not power on when the Onkyo is powered on ONLY IF AC POWER IS APPLIED TO THE HW30 WHILE THE ONKYO HAS AC POWER AND IS POWERED ON (and there is an HDMI connection between the two) I know this is crazy sounding, and probably makes sense to someone at Sony or Onkyo, but it's 100% reproducible.
With this knowledge, it's easy to avoid the problem by... simply ensuring the Onkyo TX-NR818 is powered off when you apply AC power to the Sony HW30. Everything works as expected in this case. I suspect some people haven't run into this compatibility issue between the two devices because they may not have applied AC power to the HW30 while their Onkyo was powered on.
4/8/2013 Update
Well... even with the approach mentioned above, the 12 blinking lights does occasionally occur. The workaround isn't perfect. :(
HDMI Output Settings Introduction
2/10/2013
The TX-NR818 has two HDMI outputs. These are called Main and Sub. The product specification doesn't clearly indicate this, but the two outputs are significantly different. You should not assume they will mirror each other.
The Onkyo's TX-NR818 HDMI output is controlled by the Monitor Out parameter. To access, press Home on the remote, then select Setup (the toolbox icon), select the item "1. Input/Output Assign" and finally select "1. Monitor Out". The Monitor Out setting allows for 3 values, which are Main, Sub, and Both. Main means only the HDMI Main output is active. Sub means only the "sub" (secondary) HDMI output is active. Finally, Both means that the Main and Sub HDMI outputs are enabled simultaneously.
The following sections describe the 3 configurations. This is my best understanding after running many test scenarios. However, I don't claim to have run every possible scenario. I'd love to hear any feedback.
HDMI Monitor Out = Main Explained
2/10/2013
The Onkyo's manual does an exceptionally poor job of explaining how the HDMI output functions as a whole. It talks about the various settings but doesn't explain how they fit together. I spent some time running through various combinations and the following text is my current understanding.
Note: This section assumes the Monitor Out parameter is set to Main. This means output HDMI using only the Main HDMI output. There is more discussion on the other settings further down.
There are two main settings and these settings interact with the other. These settings are listed below and then their interaction is described.
| Monitor Out:Resolution |
This is a global setting available through the Home menu. To access, press Home on the
remote, then select Setup (the toolbox icon), select the item "1. Input/Output Assign"
and finally select "1. Monitor Out". Note that the "Setup" mentioned here is not the
same as the setup activated by pressing the button on the remote labeled setup.
The following values may be used: Source, Through, Auto, and several standard formats (480p, 720p, etc). |
| Picture Mode |
Unlike Monitor Out:Resolution, the Picture Mode parameter is specified for each input
(example: Bluray or Game 1). It is accessed by the Home menu. Press Home on the remote,
then select Setup (the toolbox icon), scroll down to "4. Source Setup" and finally
select "5. Picture Adjust". Note that some of the Picture Mode parameters can be
accessed by pressing the Setup button on the remote, but not all of them!
The following values may be used: Through, Direct and Custom (as well as a list of so called ISF modes which I'm ignoring). However, when Picture Mode is set to Custom, several other parameters become available. Of these newly available parameters, the one I'll focus on is called Resolution. It ensure it's always clear whether Resolution is referring to the Monitor Out resolution or the Picture Mode's Custom resolution, I'll always use the terminology "Monitor Out:Resolution" and "Custom:Resolution". Picture Mode's Custom:Resolution allows for several modes including 480p, 720p, 1080i, 1080p, Through and Auto. |
The most important item to know about Monitor Out:Resolution and Picture Mode is that neither has a higher priority than the other. The setting of each parameter must be understood in order to know the result.
Note: the discussion below doesn't consider the 4k upconvert option since I don't have the ability to test it.
I haven't come up with a simple sentence describing how all these parameters relate, but I've managed to summarize it as succinctly as possible below.
Rule 0: The TX-NR818 will never downconvert. For example, if you have a 720p source the TX-NR818 will never convert it to 480p. This also means that a 1080p input source will always be output at 1080p (ignoring 4k). This is regardless of what the settings say to do. I didn't see this mentioned in the manual anywhere. Please keep rule 0 in mind when any of the rules below mention conversion.
At first I though the entire video processing on my TX-NR818 was broke because the TX-NR818 video formats had no effect. It made sense, however, when I realized the unit will never downconvert and my source was providing 1080p content.
Rule 1: If an input's Picture Mode is set to Direct, it overrides the Monitor Out:Resolution setting and the TX-NR818's HDMI output will be the same as the source's input
Rule 2: Setting Monitor Out:Resolution to Auto (when an input's Picture Mode is not Direct) will cause the TX-NR818 to convert the content to the highest format (e.g., 1080p) supported by your display
Rule 3: Setting Monitor Out:Resolution to 480p/720p/1080i/1080p (when an input's Picture Mode is not Direct) will cause the TX-NR818 to convert the content to the specified value for output
Rule 4: Setting Monitor Out:Resolution to Through (when an input's Picture Mode is not Direct) tells the TX-NR818 that its output format should always be equal to its input format.
Rule 5: When Monitor Out:Resolution is set to Source (when an input's Picture Mode is not Direct) , the input's Custom:Resolution will be used to determine the TX-NR818's output format. Custom:Resolution values of 480p, 720p, 1080i, and 1080p are self explanatory. The value "Through" for Custom:Resolution means the 818 will make the output format match the input format. The value "Auto" for Custom:Resolution means the 818 will select the highest resolution supported by the display. Picture Mode's Custom:Resolution is ignored unless Monitor Out:Resolution is set to Source.
You may be asking, "what's the difference between Through and Direct?" It's subtle but significant. When Though is used as a parameter for Monitor Out:Resolution, it means the output format will be equal to the input's format. There is no Direct in this context since Monitor Out:Resolution doesn't offer this option. However, when looking at an individual input's Picture Mode, both Through and Direct are potential parameters. Here is the scoop...
Direct stands on its own and always has the same behavior. The TX-NR818's output is set to the same format as the source's input. Also note that the video processing is disabled.
Through uses information from Monitor Out:Resolution to determine its behavior. Through has no effect when Monitor Out:Resolution is set to Auto (consistent with Rule 2 above) or when set to 480p/720p/1080i/1080p (consistent with Rule 3 above). Put another way, if an input's Picture Mode is set to Through then the output format will be whatever was specified by Monitor Out:Resolution when set to Auto/480p/720p/1080i/1080p. In these situations the resulting output from using Picture Mode Through and Picture Mode Direct can be different.
Here is an example: The source is 720p. Monitor Out:Resolution is set to 1080p. If the input's Picture Mode is set to Through then the output will be 1080p (see rule 2). However, if the input's Picture Mode is set to Direct then the output will be 720p (see rule 1).
Finally, if Monitor Out:Resolution is set to Through or set to Source, then an input's Picture Mode setting of Through or Direct will output the exact same resolution. However, an important distinction is that the Picture Mode of Direct will have no video processing while the Picture mode of Through will have image processing applied.
Let's pull all this together with same "How would I do this" examples.
Q: What if I want the TX-NR818 to be a fancy HDMI switch and provide no Video Processing?
A: Set Monitor Out:Resolution to Source and set each input's Picture Mode to Direct
Q: What if I want the TX-NR818 to have video processing to "clean up" the image (remove
noise) but I want the source's resolution to always be used for the output resolution?
A: Set Monitor Out:Resolution to Through and set each input's Picture Mode to Through
Q: I'd like to always output 1080p and take advantage of the video processing. How do I do
this?
A: Set Monitor Out:Resolution to 1080p and set each input's Picture Mode to Through
HDMI Monitor Out = Sub Explained
2/10/2013
When Monitor Out is set to Sub, the TX-NR818 behaves like a slightly advanced HDMI switch. Onkyo forces the Monitor Out:Resolution to be Through. This means the video format of the source is always the video format outputted by the TX-NR818. Unfortunately this is a poor choice of wording because the behavior of Through while Monitor Out is set to Sub is different than the behavior of Through when Monitor Out is set to Main. Onkyo, are you listening? I'm confident you could organize all these settings much more effectively and with consistent terminology.
The difference in the Through functionality is that for Main, Through enables video processing. However, for Sub the Through setting does not enable video processing.
I used the term "slightly advanced" earlier because while Main Output is set to Sub the TX-NR818 will display information text on top of the video, such as the volume control and the "input/output information" available by pressing the display button on the remote. However, the text and presentation is very primitive. It is noticeably different than the presentation offered on the Main HDMI output. Bottom line, it's kind of ugly (especially for a nice receiver). You cannot access the "Home" menu and see the various icons (or see internet music services or the so called "Instaview"). The settings functionality still exists, however, you need to watch the front panel.
While navigating through the menus using the front panel, I noticed that Onkyo has removed the "5. Picture Adjust" option from the Home->Settings functionality. Similarly, you cannot change the Picture Mode using the "Setup" button on the remote.
Bottom line: When Monitor Out is set to Sub, the Monitor Out:Resolution is forced to be a "no video processor" variant of Through. In this configuration, the Onkyo TX-NR818 behaves like the Picture Mode is set to Direct. What comes in as an input is what goes out.
HDMI Monitor Out = Both Explained
2/10/2013
This combination is discussed last because the behavior is a subset of the Main and Sub behaviors described above. As mentioned earlier, setting Monitor Out to Both does not cause the two HDMI outputs to be mirrored. Under some configurations, you can get the two to be very similar.
When Monitor Out is set to Both, the TX-NR818 forces the Monitor Out:Resolution to be Auto. Being more complete and using Onkyo's (questionable?) terminology, this really means ...
Main output is operating as if Monitor out was set to Main and Monitor Out:Resolution was set to Auto
Sub output is operating as if Monitor out was set to Sub
Let's start with the Sub because it's easy to describe. When Monitor Out is set to Both, the Sub behaves as described in the Sub section above. Note that the "5. Picture Adjust" and "Picture Mode" settings are available (unlike when Monitor Out is set to Sub, but they have no impact on the sub's output). It's the "no video processor" variant of Through.
For the Main output, the TX-NR818 will pick the displays highest resolution and output that format (with video processing) in all causes except for when the input source's Picture Mode is set to direct. You still have the ability to put the Main output into Direct mode, which disables video processing and ensures the output format is the same as the input format.
Note: for my testing I only had a single HDMI display. This display has 2 HDMI inputs, allowing me to test the Main and Sub outputs from the TX-NR818. This means that the Onkyo saw devices on each HDMI output that supported the same video formats. The scenarios would get more complex if you had two different displays that supported different resolutions. It's my (complete) guess that in such a situation the Sub would continue to output the sources video format (regardless of whether the display supports it) and the Main would output video using the highest available format supported by the connected display.
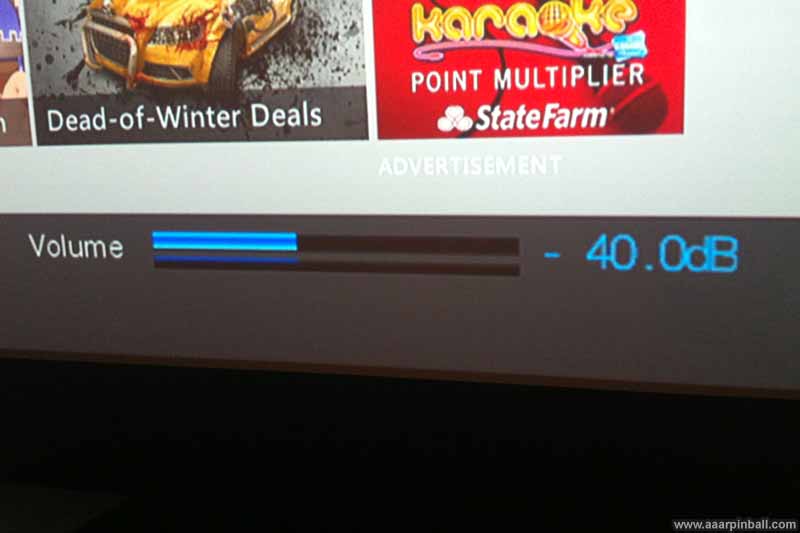
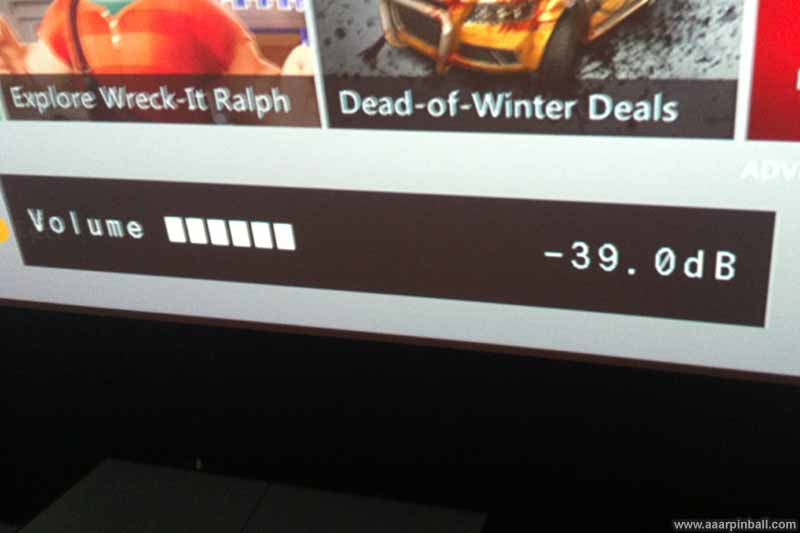
Graphics on Main Output vs. Sub Output
2/13/2013
I mentioned earlier that the TX-NR818 has a significantly different visual style for graphics displayed on the Main HDMI output compared to those displayed on the Sub HDMI output. It appears the the TX-NR818 is only capable of displaying text on the Sub output. Below are some pictures showing the difference. Let's start with the volume bar on the Main output, which is shown below.
And below is the volume bar displayed on the Sub output.
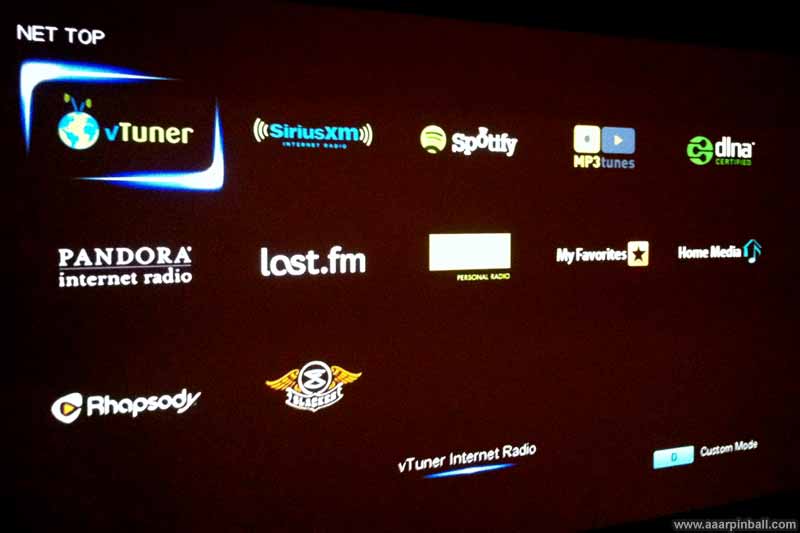
Now for the "network audio" channels. Below is what is displayed on the Main output.
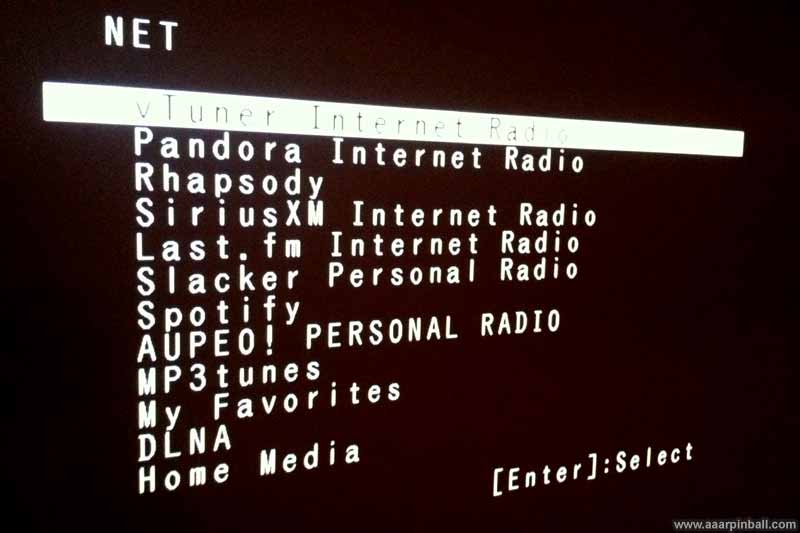
The picture below is the "network audio" channels on the Syb output.
3D Support
2/15/2013
I've watched 3D blurays through the TX-NR818 with no trouble. What I found impressive is that the TX-NR818 will continue to display on-screen graphics overlayed on the 3D video while keeping 3D active. I've seen other systems that basically disable 3D when something needs to be overlayed. For example, the volume bar and the home/setup are superimposed over the 3D.
That was for the Main output, but the story isn't the same for the sub output. You get no on-screen graphics when playing 3D content on the sub. I mentioned above hat the "graphics" on the sub output are inferior to those on the main output, so there is clearly a different hardware path. It seems the hardware path for the sub output doesn't support graphic overlay on 3d content.
AV Sync (Lip Sync) Resetting
2/15/2013
This needs a little more examination, but I'll give it a 95% accuracy assessment. When using the HDMI Monitor Out setting of Both, the AV sync feature is a little broken. If I go into the Home/Setup/source configuration and adjust the AV sync, this setting is lost each time one of the external displays is activated. By lost I mean it resets to zero. I did find that this "issue" goes away if I go to the Home/Setting/Hardware menu and disable the function that uses the display's provided info to set lip sync. I believe I'll keep that setting disabled.
Warning About 4k Output
2/9/2013
The Onkyo TX-NR818 supports upsampling content to 4k resolution. As of this writing, most displays do not support 4k and will display a blank screen when provided this format. It is possible to configure the 818 to always output 4k on a specific source accidentally. This can be done through a combination of Monitor Out:Resolution (set to Source) and Picture Mode:Resolution (set to 4k). If you do this, however, you will be unable to adjust the Picture Mode using your display because it will always be blank. You may need to use the front panel of the 818 to change this mode.
I write this for first hand experience. I accidentally switched an input to 4k while testing these various modes and, for a while, though the Onkyo had broken or encounter a software bug. It turned out to be user error...
Not that Onkyo is reading this, but I have a suggestion for them. Add a configuration that says "enable 4k support". If the user has not enabled this, none of the 4k options should appear in the menus. As it stands now, they offer no value to the vast majority of owners and can actually cause difficulty.
How does the Component to HDMI Conversion work?
2/10/2013
My Nintendo Wii uses a component video cable which enables the Wii to output 480p. I tested out the TX-NR818's component to HDMI conversion using this configuration and it worked well with a small caveat.
When the Wii's 480p output is converted to HDMI and viewed on my display, the resulting image has a black boarder. It looks as if the Wii's image is "inset" into the screen area a bit, much like a postage stamp on a black background. I believe I understand why this occurs, but haven't run any tests to 100% prove it. My best guess at this behavior is explained below. I'll update this when I get some more information.
An attribute of traditional analog displays (such as ones that support 480i) is that they never displayed the entire image. The edges (top, bottom, left and right) were simply not visible. This was an artifact of the technology and called "overscan". With modern displays, however, this isn't a problem.
This wasn't a problem for analog video. Video producers simply realized that the edges might not be visible. Video game designers were aware of this also. Realizing that creating graphics for an area of the screen that wouldn't be visible was a waste of memory and CPU, sometimes the game designers (or hardware designers) decided to simply never display anything in the area of the image that is typically overscanned. My belief is that the Nintendo Wii makes this optimization.
What's interesting is that when the Wii is connected directly to my display via component, the inset image behavior doesn't occur. I believe this is because my display is "smart" and automatically enables simulated overscanning for analog inputs with 480i/p inputs. Because the display doesn't know the original video from the Wii was 480p (since the TX-NR818 converted it to 1080p), it doesn't automatically enable overscan and the Wii's choice not to fill the entire 480i/p content is visible. I did show that manually enabling over scan on my display does cause the image to fill the screen "correctly"
It seems like a feature oversight on the TX-NR818 to not allow the conversion from 480i/p component sources to account for overscan. This would avoid having to set the display's setting manually.
Appendix A: Test Cases for HDMI Output Analysis
2/10/2013
Below are the test cases I documented when attempting to figure out the TX-NR818's HDMI behavior. I ran several other tests but didn't document them as completely.
The these tests, the display device supported all the standard output formats (480p/720p/1080i/1080p).
|
Source's Input Format |
Setting for |
Setting for |
Resulting Main HDMI Output |
|
720p |
Auto |
Custom:Resolution = 480p |
1080p |
|
720p |
Auto |
Custom:Resolution = 720p |
1080p |
|
720p |
Auto |
Custom:Resolution = 1080i |
1080p |
|
720p |
Auto |
Custom:Resolution = 1080p |
1080p |
|
720p |
Auto |
Custom:Resolution = Through |
1080p |
|
720p |
Auto |
Custom:Resolution = Auto |
1080p |
|
720p |
Auto |
Through |
1080p |
|
720p |
Auto |
Direct |
720p |
|
720p |
480p |
Custom:Resolution = 480p |
720p |
|
720p |
480p |
Custom:Resolution = 720p |
720p |
|
720p |
480p |
Custom:Resolution = 1080i |
720p |
|
720p |
480p |
Custom:Resolution = 1080p |
720p |
|
720p |
480p |
Custom:Resolution = Through |
720p |
|
720p |
480p |
Custom:Resolution = Auto |
720p |
|
720p |
480p |
Through |
720p |
|
720p |
480p |
Direct |
720p |
|
720p |
720p |
Custom:Resolution = 480p |
720p |
|
720p |
720p |
Custom:Resolution = 720p |
720p |
|
720p |
720p |
Custom:Resolution = 1080i |
720p |
|
720p |
720p |
Custom:Resolution = 1080p |
720p |
|
720p |
720p |
Custom:Resolution = Through |
720p |
|
720p |
720p |
Custom:Resolution = Auto |
720p |
|
720p |
720p |
Through |
720p |
|
720p |
720p |
Direct |
720p |
|
720p |
1080i |
Custom:Resolution = 480p |
1080i |
|
720p |
1080i |
Custom:Resolution = 720p |
1080i |
|
720p |
1080i |
Custom:Resolution = 1080i |
1080i |
|
720p |
1080i |
Custom:Resolution = 1080p |
1080i |
|
720p |
1080i |
Custom:Resolution = Through |
1080i |
|
720p |
1080i |
Custom:Resolution = Auto |
1080i |
|
720p |
1080i |
Through |
1080i |
|
720p |
1080i |
Direct |
720p |
|
720p |
1080p |
Custom:Resolution = 480p |
1080p |
|
720p |
1080p |
Custom:Resolution = 720p |
1080p |
|
720p |
1080p |
Custom:Resolution = 1080i |
1080p |
|
720p |
1080p |
Custom:Resolution = 1080p |
1080p |
|
720p |
1080p |
Custom:Resolution = Through |
1080p |
|
720p |
1080p |
Custom:Resolution = Auto |
1080p |
|
720p |
1080p |
Through |
1080p |
|
720p |
1080p |
Direct |
720p |
|
720p |
Through |
Custom:Resolution = 480p |
720p |
|
720p |
Through |
Custom:Resolution = 720p |
720p |
|
720p |
Through |
Custom:Resolution = 1080i |
720p |
|
720p |
Through |
Custom:Resolution = 1080p |
720p |
|
720p |
Through |
Custom:Resolution = Through |
720p |
|
720p |
Through |
Custom:Resolution = Auto |
720p |
|
720p |
Through |
Through |
720p |
|
720p |
Through |
Direct |
720p |
|
720p |
Source |
Custom:Resolution = 480p |
720p |
|
720p |
Source |
Custom:Resolution = 720p |
720p |
|
720p |
Source |
Custom:Resolution = 1080i |
1080i |
|
720p |
Source |
Custom:Resolution = 1080p |
1080p |
|
720p |
Source |
Custom:Resolution = Through |
720p |
|
720p |
Source |
Custom:Resolution = Auto |
1080p |
|
720p |
Source |
Through |
720p |
|
720p |
Source |
Direct |
720p |